Buttons
About
Buttons are used inside the List operation and Show operation, to allow the admin to trigger other operations. Some buttons point to entirely new routes (eg. create, update, show), others perform the operation on the current page using AJAX (eg. delete).
Button Stacks
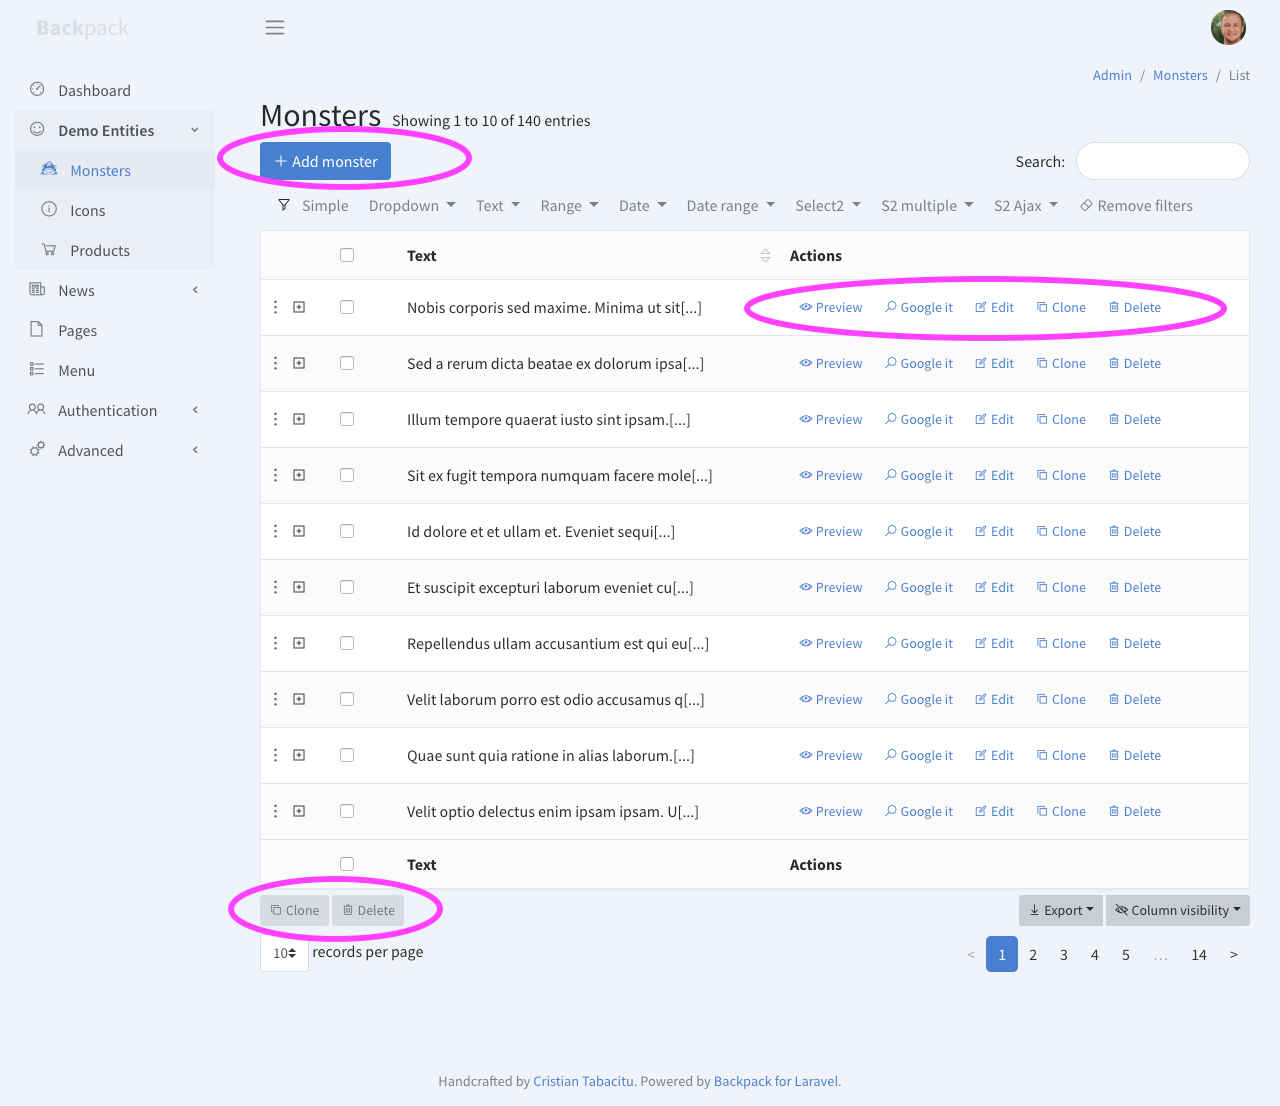
The ShowList operation has 3 places where buttons can be placed:
top(where the Add button is)line(where the Edit and Delete buttons are)bottom(after the table)
When adding a button to the stack, you can choose whether to insert it at the beginning or end of the stack by specifying that as a last parameter.
Default Buttons
There are no "default buttons". But each operation can add buttons to other operations. Most commonly, operations add their own button to the List operation, since that's the "home page" for performing operations on entries. So if you go to a CRUD where you're using the most common operations (Create, Update, List, Show) you will notice in the List operation that:
- the
createbutton intopstack; - the
update,deleteandshowbuttons in thelinestack;
Most buttons are invisible if an operation has been disabled. For example, you can:
- hide the "delete" button using
CRUD::denyAccess('delete'); - show a "preview" button by using
CRUD::allowAccess('show');
Buttons API
Here are a few things you can call in your EntityCrudController's setupListOperation() method, to manipulate buttons:
// possible stacks: 'top', 'line', 'bottom';
// possible positions: 'beginning' and 'end'; defaults to 'beginning' for the 'line' stack, 'end' for the others;

// collection of all buttons
CRUD::buttons();

// add a button; possible types are: view, model_function
CRUD::addButton($stack, $name, $type, $content, $position);

// add a button whose HTML is returned by a method in the CRUD model
CRUD::addButtonFromModelFunction($stack, $name, $model_function_name, $position);

// add a button whose HTML is in a view placed at resources\views\vendor\backpack\crud\buttons
CRUD::addButtonFromView($stack, $name, $view, $position);

// remove a button
CRUD::removeButton($name);

// remove a button for a certain stack
CRUD::removeButtonFromStack($name, $stack);

// remove multiple buttons
CRUD::removeButtons($names, $stack);

// remove all buttons
CRUD::removeAllButtons();

// remove all buttons for a certain stack
CRUD::removeAllButtonsFromStack($stack);

// order buttons in a stack, order is an array with the ordered names of the buttons
CRUD::orderButtons($stack, $order);

// modify button, modifications are the attributes and their new values.
CRUD::modifyButton($name, $modifications);

// Move the target button to the destination position, target and destion are the button names, where is 'before' or 'after'
CRUD::moveButton($target, $where, $destination);
Overriding a Button
Before showing any buttons, Backpack will check your resources\views\vendor\backpack\crud\buttons directory, to see if you've overriden any buttons. If it finds a blade file with the same name there as the operation buttons, it will use your blade file, instead of the one in the package.
That means you can override an existing button simply by creating a blade file with the same name inside this directory.
Creating a Quick Button
Most of the times, the buttons you want to create aren't complex at all. They're just an <a> element, with a href and class that is show if the admin has access to that particular operation. That's why we've created the quick.blade.php button, that allows you to quickly create a button, right from your Operation or CrudController. This covers most simple use cases:
// the following example will create a button for each entry in the table with:
// label: Email
// access: Email
// href: /entry/{id}/email
CRUD::button('email')->stack('line')->view('crud::buttons.quick');

// you can also add buttons on the "top" stack
CRUD::button('export')->stack('top')->view('crud::buttons.quick');

// if you need to control the access to "Email" per entry, you can do:
CRUD::setAccessCondition('Email', function ($entry) {
    return $entry->hasVerifiedEmail();
});

// or enable it for all entries:
CRUD::allowAccess('Email');

// directly in the button also works:
CRUD::button('email')->stack('line')->view('crud::buttons.quick')->meta([
    'access' => true,
]);

// you can easily customize Access, Name, Label, Icon in `meta`
// and even the attributes of the <a> element in meta `wrapper`
CRUD::button('email')->stack('line')->view('crud::buttons.quick')->meta([
    'access' => true,
    'label' => 'Email',
    'icon' => 'la la-envelope',
    'wrapper' => [
        'element' => 'a',
        'href' => url('something'),
        'target' => '_blank',
        'title' => 'Send a new email to this user',
    ]
]);

// build custom URL using closure
CRUD::button('email')->stack('line')->view('crud::buttons.quick')->meta([
    'wrapper' => [
        'href' => function ($entry, $crud) {
            return backpack_url("invoice/$entry->id/email");
        },
    ],
]);
You should always control the access of your buttons. The key for access by default is the button name
->studly()with a fallback to the button name without modifications. It means that for a button namedsome_button, the access key will be eitherSomeButtonorsome_button. Eg:CRUD::allowAccess('some_button')orCRUD::allowAccess('SomeButton').
Create a Quick Button with Ajax
Quick Buttons can be easily configured to make an AJAX request. This is useful when you want to perform an operation without leaving the page. For example, you can send an email to a user without leaving the page.
// enable ajax
CRUD::button('email')->stack('line')->view('crud::buttons.quick')->meta([
    'label' => 'Email',
    'icon' => 'la la-envelope',
    'wrapper' => [
        'href' => function ($entry, $crud) {
            return backpack_url("invoice/$entry->id/email");
        },
    'ajax' => true, // <- just add `ajax` and it's ready to make ajax request
]);

// optional ajax configuration
'ajax' => [
    'method' => 'POST',
    'refreshCrudTable' => false, // should the crud table be refreshed after a successful request ?
    'success_title' => "Payment Reminder Sent", // the title of the success notification
    'success_message' => 'The payment reminder has been sent successfully.', // the message of the success notification
    'error_title' => 'Error', // the title of the error notification
    'error_message' => 'There was an error sending the payment reminder. Please try again.', // the message of the error notification
],
You can overwrite the success/error messages by returning a message key from the response or providing the exception message.
public function email($id)
{
    CRUD::hasAccessOrFail('email');

    $user = CRUD::getEntry($id);

    if($user->alreadyPaid()) {
        return abort(400, 'The user has already paid.');
    }

    $user->schedulePaymentEmail();

    return response()->json([
        'message' => 'The payment reminder has been sent successfully.',
    ]);

    // to return the default or field messages just return the response status without message:
    // return reponse('');
    // return response('', 400);
    // abort(400);

}
Creating a Custom Button
To create a completely custom button:
- run
php artisan backpack:button new-button-nameto create a new blade file inresources\views\vendor\backpack\crud\buttons - add that button using the
addButton()syntax, in the EntityCrudControllers you want, inside thesetupListOperation()method;
// add a button whose HTML is in a view placed at resources\views\vendor\backpack\crud\buttons
CRUD::addButtonFromView($stack, $name, $view, $position);
In the blade file, you can use:
$entry- the database entry you're showing (only inside thelinestack);$crud- the entire CrudPanel object;$button- the button you're currently showing;$meta['something']- any custom attribute the developer has passed, using themetas()method;
Note: If you've opted to add a button from a model function (not a blade file), inside your model function you can use $this to get the current entry (so for example, you can do $this->id.
Examples
Adding a Custom Button with a Blade File
Let's say we want to create a simple moderate.blade.php button. This button would just open a user/{id}/moderate/ route, which would point to UserCrudController::moderate(). The steps would be:
-
Create the
resources\views\vendor\backpack\crud\buttons\moderate.blade.phpfile:@if ($crud->hasAccess('update', $entry)) <a href="{{ url($crud->route.'/'.$entry->getKey().'/moderate') }} " class="btn btn-xs btn-default"><i class="la la-ban"></i> Moderate</a> @endif -
Add the new route, next to
UserCrudController's route (most likely insideroutes/backpack/custom.php):Route::get('user/{id}/moderate', 'UserCrudController@moderate'); -
We can now add a
moderate()method to ourUserCrudController, which would moderate the user, and redirect back.public function moderate() { // show a form that does something } -
Now we can actually add this button to any of
UserCrudController::setupListOperation():CRUD::addButtonFromView('line', 'moderate', 'moderate', 'beginning');
Adding a Custom Button without a Blade File
Instead of creating a blade file for your button, you can use a function on your model to output the button's HTML.
In your ArticleCrudController::setupListOperation():
// add a button whose HTML is returned by a method in the CRUD model
CRUD::addButtonFromModelFunction('line', 'open_google', 'openGoogle', 'beginning');
In your Article model:
public function openGoogle($crud = false)
{
    return '<a class="btn btn-sm btn-link" target="_blank" href="http://google.com?q='.urlencode($this->text).'" data-toggle="tooltip" title="Just a demo custom button."><i class="la la-search"></i> Google it</a>';
}
Adding a Custom Button with JavaScript to the "top" stack
Let's say we want to create an import.blade.php button. For simplicity, this button would just run an AJAX call which handles everything, and shows a status report to the user through notification bubbles.
The "top" buttons are not bound to any certain entry, like buttons from the "list" stack. They can only do general things. And if they do general things, it's generally recommended that you move their JavaScript to the bottom of the page. You can easily do that with @push('after_scripts'), because the Backpack default layout has an after_scripts stack. This way, you can make sure your JavaScript is moved at the bottom of the page, after all other JavaScript has been loaded (jQuery, DataTables, etc). Check out the example below.
The steps would be:
- Create the
resources\views\vendor\backpack\crud\buttons\import.blade.phpfile:
@if ($crud->hasAccess('create'))
    <a href="javascript:void(0)" onclick="importTransaction(this)" data-route="{{ url($crud->route.'/import') }}" class="btn btn-sm btn-link" data-button-type="import">
<span class="ladda-label"><i class="la la-plus"></i> Import {{ $crud->entity_name }}</span>
</a>
@endif

@push('after_scripts')
<script>
    if (typeof importTransaction != 'function') {
      $("[data-button-type=import]").unbind('click');

      function importTransaction(button) {
          // ask for confirmation before deleting an item
          // e.preventDefault();
          var button = $(button);
          var route = button.attr('data-route');

          $.ajax({
              url: route,
              type: 'POST',
              success: function(result) {
                  // Show an alert with the result
                  console.log(result,route);
                  new Noty({
                      text: "Some Tx had been imported",
                      type: "success"
                  }).show();

                  // Hide the modal, if any
                  $('.modal').modal('hide');

                  crud.table.ajax.reload();
              },
              error: function(result) {
                  // Show an alert with the result
                  new Noty({
                      text: "The new entry could not be created. Please try again.",
                      type: "warning"
                  }).show();
              }
          });
      }
    }
</script>
@endpush-
Add the new route, next to
UserCrudController's route (most likely insideroutes/backpack/custom.php):Route::get('user/import', 'UserCrudController@import'); -
We can now add a
import()method to ourUserCrudController, which would import the users.public function import() { // whatever you decide to do } -
Now we can actually add this button to any of
UserCrudController::setupListOperation():CRUD::addButtonFromView('top', 'import', 'import', 'end');
Adding a Custom Button That Is Visible Only for Some Entries
Let's say we want to create a simple approve.blade.php button. But not all entries can be approved. In that case, you will want your approve button to pass the $entry as a second parameter, when checking for access:
// resources\views\vendor\backpack\crud\buttons\approve.blade.php

@if ($crud->hasAccess('approve', $entry))
  <a href="{{ url($crud->route.'/'.$entry->getKey().'/approve') }} " class="btn btn-xs btn-default"><i class="la la-thumbs-up"></i> Approve</a>
@endif
Then in your ProductCrudController you can define the access to this approve operation per entry:
// allow or deny access depending on the entry
$this->crud->setAccessCondition('approve', function ($entry) {
    return $entry->category !== 1 ? true : false;
});
Similarly, you can define the access per user:
// allow or deny access depending on the user
$this->crud->setAccessCondition('approve', function ($entry) {
    return backpack_user()->id == 1 ? true : false;
});
Reorder buttons
The default order of line stack buttons is 'edit', 'delete'. Let's say you are using the ShowOperation, by default the preview button gets placed in the beggining of that stack, if you want to move it to the end of the stack you may use orderButtons or moveButton.
CRUD::orderButtons('line', ['update', 'delete', 'show']);CRUD::moveButton('show', 'after', 'delete');