2. CRUD Operations
Duration: 10 minutes
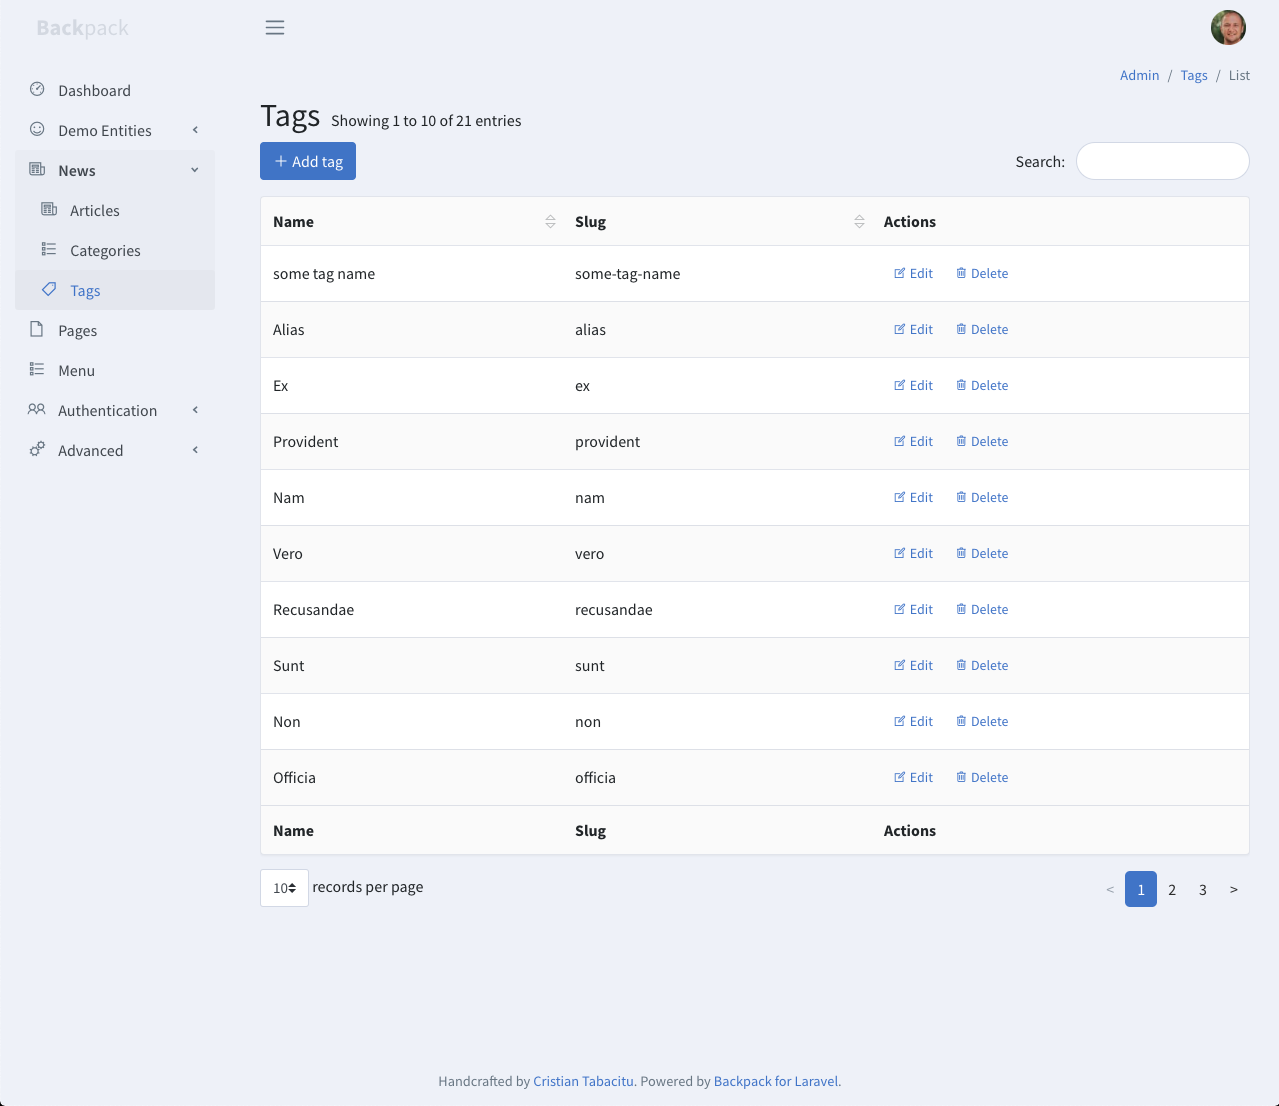
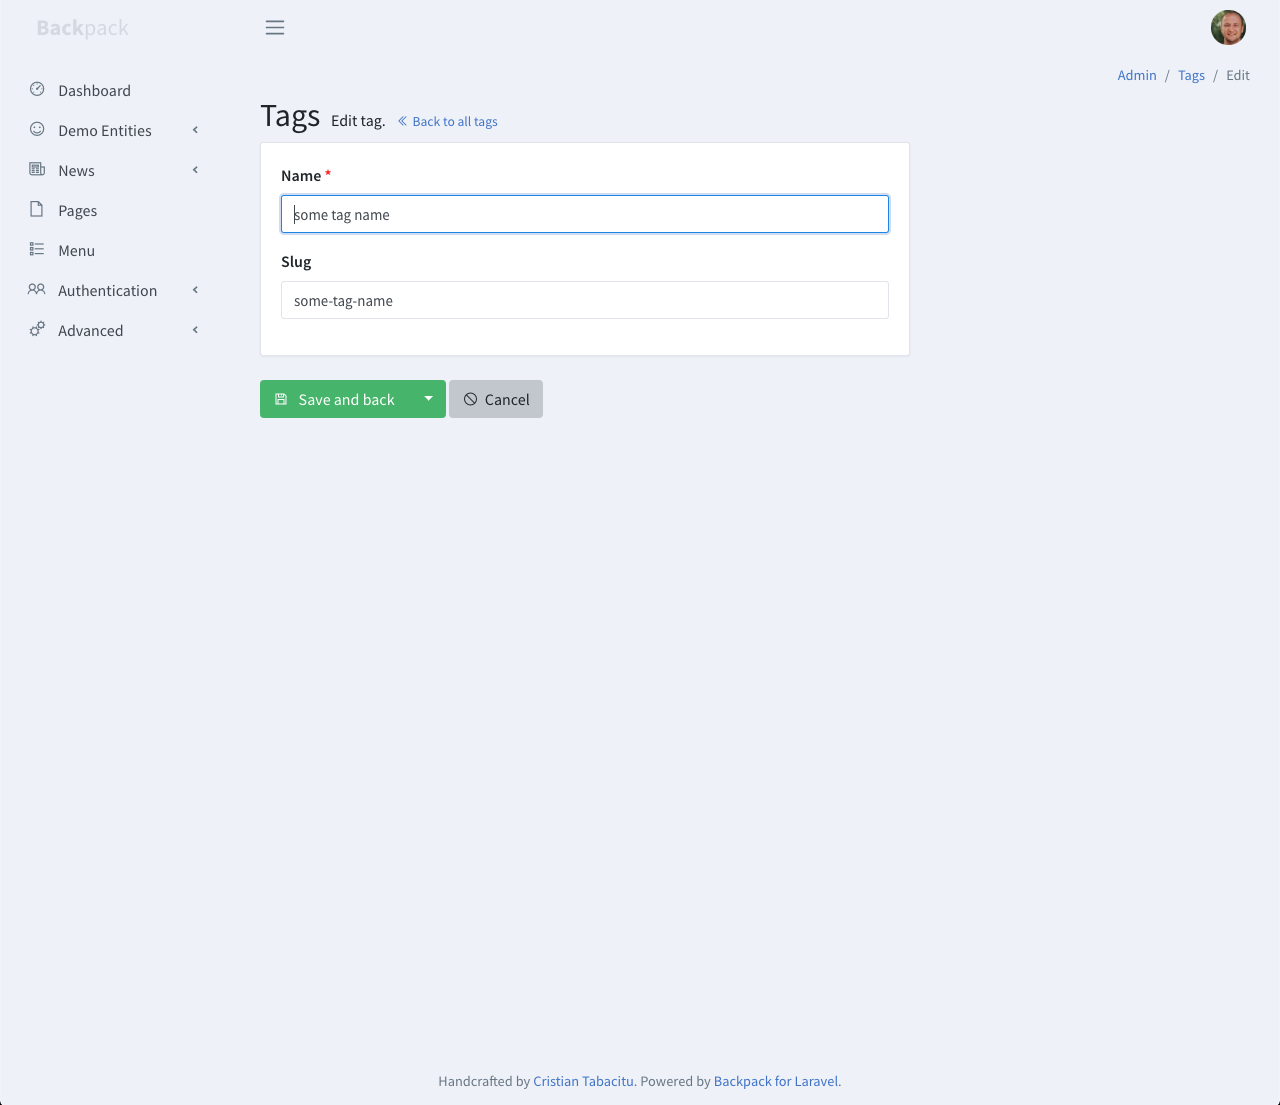
Let's bring back the example from our first lesson. The Tags CRUD:

With its TagCrudController:
<?php namespace App\Http\Controllers\Admin;

use Backpack\CRUD\app\Http\Controllers\CrudController;
use App\Http\Requests\TagCrudRequest;

class TagCrudController extends CrudController {

  use \Backpack\CRUD\app\Http\Controllers\Operations\ListOperation;
  use \Backpack\CRUD\app\Http\Controllers\Operations\ShowOperation;
  use \Backpack\CRUD\app\Http\Controllers\Operations\CreateOperation;
  use \Backpack\CRUD\app\Http\Controllers\Operations\UpdateOperation;
  use \Backpack\CRUD\app\Http\Controllers\Operations\DeleteOperation;

  public function setup()
  {
      CRUD::setModel('App\Models\Tag');
      CRUD::setRoute('admin/tag');
      CRUD::setEntityNameStrings('tag', 'tags');
  }

  public function setupListOperation()
  {
      CRUD::setColumns(['name', 'slug']);
  }

  public function setupCreateOperation()
  {
      CRUD::setValidation(TagCrudRequest::class);

      CRUD::field('name');
      CRUD::field('name')->type('text')->label('URL Segment (slug)');
  }

  public function setupUpdateOperation()
  {
      $this->setupCreateOperation();
  }
}
In the example above, we've enabled the most common operations:
- Create - using a create form (aka "add form")
- List - using AJAX DataTables (aka "list view", aka "table view")
- Update - using an update form (aka "edit form")
- Delete - using a button in the list view
- Show - using a button in the list view
These are the basic operations an admin can execute on an Eloquent model, thanks to Backpack. We do have additional operations (Reorder, Revisions, Clone, BulkDelete, and BulkClone), and you can easily create a custom operation, but let's not get ahead of ourselves. Let's go through the most important features of the operations you'll be using all the time: List, Create, and Update.
Create and Update Operations

Fields
Inside your Controller's setupCreateOperation() or setupUpdateOperation() method, you'll be able to define which fields you want the admin to see, when creating/updating entries. In the example above, we only have two fields, both using the text field type. So that's what's shown to the admin. When the admin presses Save, assuming your model has those two attributes as $fillable, Backpack will save the entry and take you back to the List view. Keep in mind we're using a pure Eloquent model. So of course, inside the model you could use accessors, mutators, events, etc.
But often, you won't just need text inputs. You'll need datepickers, upload buttons, 1-n relationships, n-n relationships, textareas, etc. For each field, you only need to define it properly in the Controller. Here are the most often used methods to manipulate fields:
CRUD::field('price');
CRUD::field('price')->prefix('$'); // set the "prefix" attribute to "$"
CRUD::field('price')->remove(); // delete a field from the form
CRUD::field('price')->after('name'); // move a field after a different field

// you can of course chain these calls:
CRUD::field('price')->label('Product price')->prefix('$')->after('name');

// you can also add multiple attributes in one go, by creating
// a field using an array, instead of just its name (a string);
// we call this the array syntax:
CRUD::field([
  'name' => 'price',
  'type' => 'number',
  'label' => 'Product price',
  'prefix' => '$',
]);
A typical field definition will need at least three things:
name- the attribute (column in the database), which will also become the name of the inputtype- the kind of field we want to use (text, number, select2, etc.)label- the human-readable label for the input (will be generated fromnameif not given)
You can use one of the 44+ field types we've provided, or easily create a custom field type if you have a specific need that we haven't covered yet, or even overwrite how a field type works. Take a few minutes and browse the 44+ field types to understand how the definition array differs from one to another and how many use cases you have already covered.
Let's take another example, slightly more complicated than the text fields we used above. Something you'll encounter all the time are relationship fields. So let's say the Tag model has an n-n relationship with an Article model:
    public function articles()
    {
        return $this->belongsToMany('App\Models\Article', 'article_tag');
    }
We could use the code below to add a select2_multiple field to the Tag update forms:
CRUD::field([
    'type' => 'select2_multiple',
    'name' => 'articles', // the relationship name in your Model
    'entity' => 'articles', // the relationship name in your Model
    'attribute' => 'title', // attribute on Article that is shown to admin
    'pivot' => true, // on create&update, do you need to add/delete pivot table entries?
]);
Notes:
- If we call this inside
setupUpdateOperation(), then it will only be added on that operation - Because we haven't specified a
label, Backpack will take the "articles" name and turn it into a label, "Articles"
If we had an Articles CRUD, and the reverse relationship defined on the Article model too, then we could also add a select2_multiple field in the Article CRUD to allow the admin to choose which tags apply to each article. This actually makes more sense than the above:
CRUD::field([
    'label' => "Tags",
    'type' => 'select2_multiple',
    'name' => 'tags', // the method that defines the relationship in your Model
    'entity' => 'tags', // the method that defines the relationship in your Model
    'attribute' => 'name', // foreign key attribute that is shown to user
    'pivot' => true, // on create&update, do you need to add/delete pivot table entries?
]);
Callbacks
Developers coming from other CRUD systems will be looking for callbacks to run before_insert, before_update, after_insert, and after_update. There are no callbacks in Backpack.
Remember that Backpack is using Eloquent models. That means you can do X when Y is happening, by using the model events. For example, in your MonsterCrudController you can do:
public function setup() {
    // this will get run for all operations that trigger the "deleting" model event
    // by default, that's the Delete operation
    Monster::deleting(function ($entry) {
        // TODO: delete that entry's files from the disk
    });

    // this will get run on all operations that trigger the "saving" model event
    // by default, that's the Create and Update operations
    Monster::saving(function ($entry) {
        // TODO: change one value to another or something
    });
}
Alternatively, if you need to change how an operation does something, then that's simple too. The store() and update() code is inside a trait, so you can easily override that method and call it inside your new method. For example, here's how we can do things before/after an item is saved in the Create operation:
<?php

namespace App\Http\Controllers\Admin;

use Backpack\CRUD\app\Http\Controllers\CrudController;

class ProductCrudController extends CrudController
{
    use \Backpack\CRUD\app\Http\Controllers\Operations\CreateOperation { store as traitStore; }

    // ...

    public function store()
    {
      // do something before validation, before save, before everything
      $response = $this->traitStore();
      // do something after save
      return $response;
    }
}
But before you do that, ask yourself - is this something that should be done when an entry is added/updated/deleted from the application too? Not just from the admin panel? If so, a better place for it would be the Model. Remember your Model is a pure Eloquent Model, so the cleanest way might be to use Eloquent Event Observers or accessors and mutators.
List Operation
List shows the admin a table with all entries. On the front-end, the information is pulled using AJAX calls, and shown using DataTables. It's the most feature-packed operation in Backpack, but right now we're just going through the most important features you need to know about: columns, filters, and buttons.
You should configure the List operation inside the setupListOperation() method.
Columns
Columns help you specify which attributes are shown in the table and in which order. Their syntax is almost identical to fields. In fact, you'll find each Backpack field has a corresponding column, with the same name and syntax:
CRUD::column($column_definition_array); // add a single column, at the end of the table
CRUD::column('price')->type('number');
CRUD::column('price')->type('number')->prefix('$');
CRUD::column('price')->after('name'); // move column after another column
CRUD::column('price')->remove(); // move column after another column

// bulk actions
CRUD::addColumns([$column_definition_array_1, $column_definition_array_2]); // add multiple columns, at the end of the table
CRUD::setColumns([$column_definition_array_1, $column_definition_array_2]); // make these the only columns in the table
CRUD::removeColumns(['column_name_1', 'column_name_2']); // remove an array of columns from the table
CRUD::setColumnsDetails(['column_1', 'column_2'], ['attribute' => 'value']);
You can use one of the 44+ column types to show information to the user in the table, or easily create a custom column type if you have a specific need. Here's an example of using the methods above:
CRUD::column([
    'name' => 'published_at',
    'type' => 'date',
    'label' => 'Publish_date',
]);

// PRO TIP: to quickly add a text column, just pass the name string instead of an array
CRUD::column('text'); // adds a text column, at the end of the stack
Filters

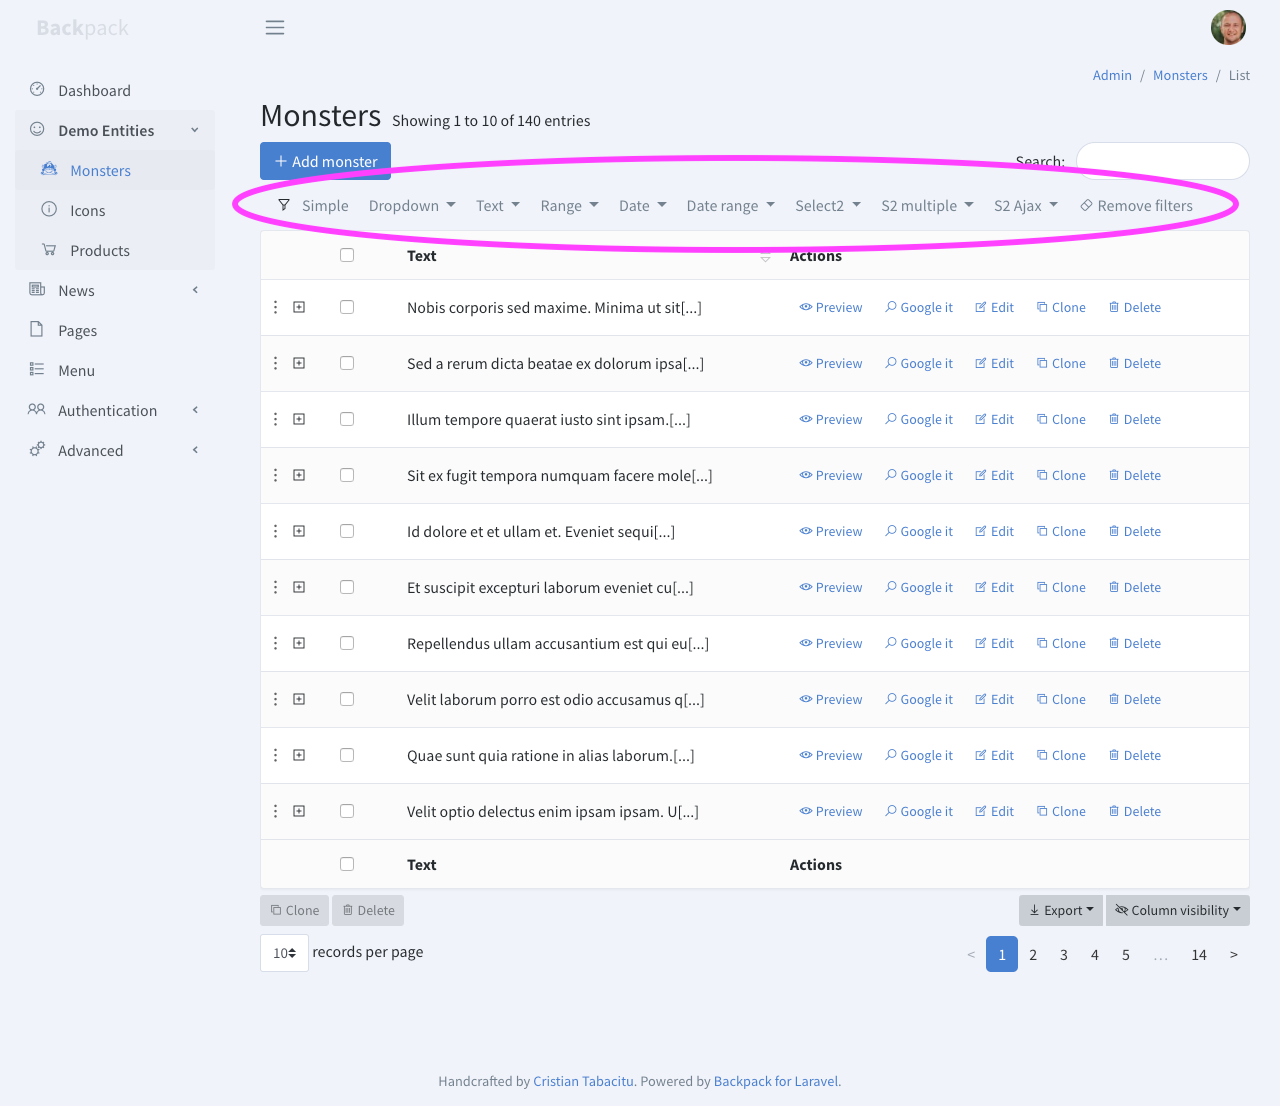
Filters provide an easy way for the admin to filter the List table. The syntax is very similar to Fields and Columns and you can use one of the existing 8 filter types or easily create a custom filter. Note that this is a PRO feature.
CRUD::addFilter($options, $values, $filter_logic);
CRUD::removeFilter($name);
CRUD::removeAllFilters();
For more on filters, check out the filters documentation page.
Buttons

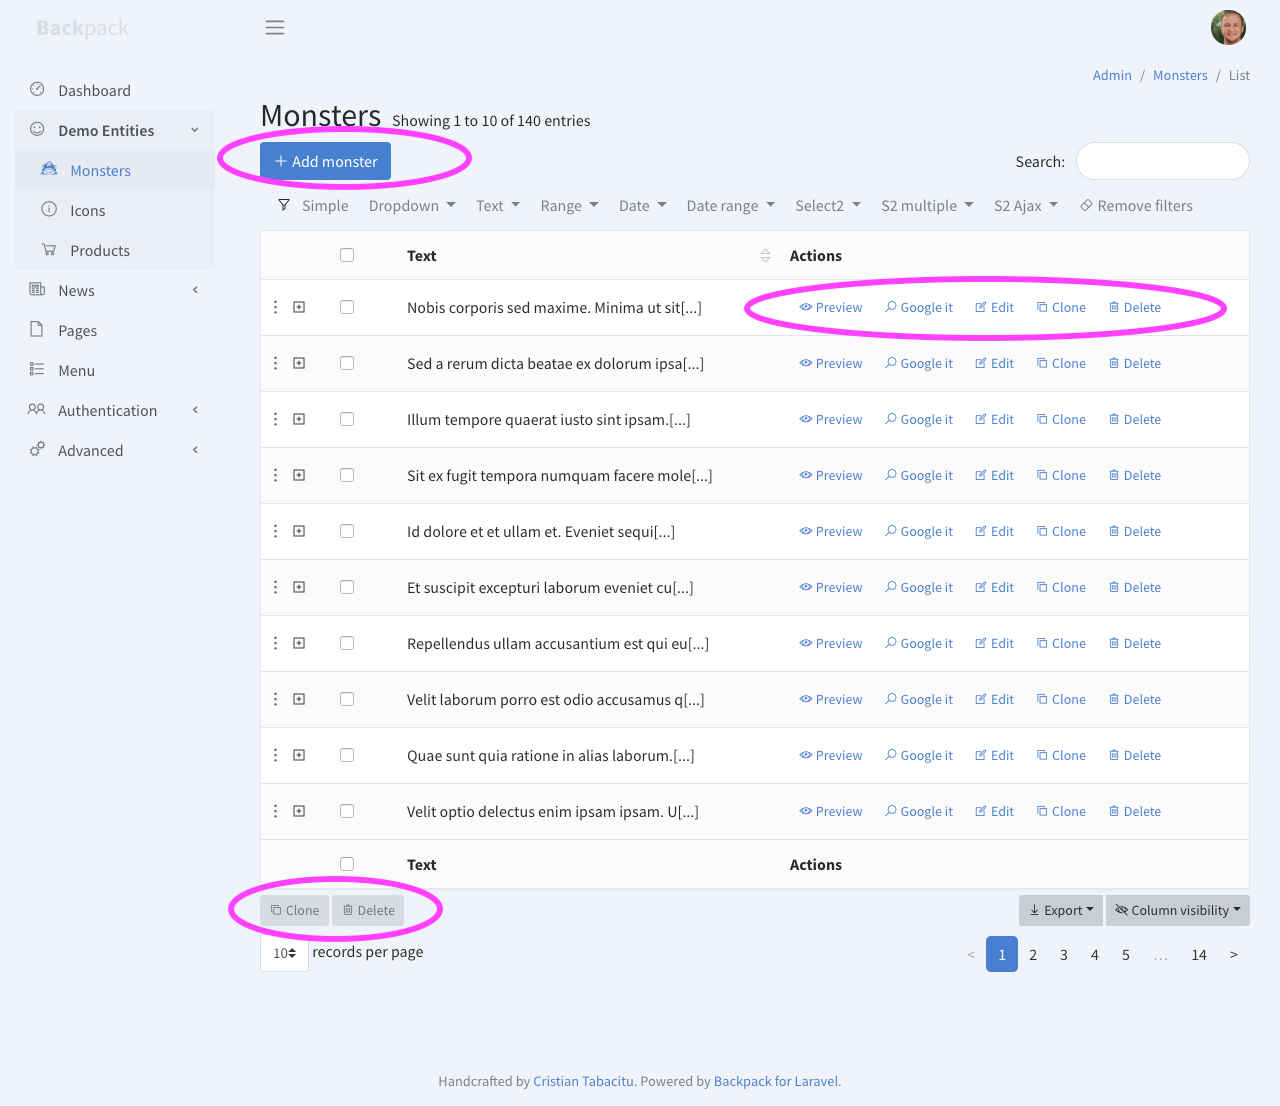
If you want to add a custom button to an entry, you can do that. If you want to remove a button, you can also do that. Check out the buttons documentation.
// positions: 'beginning' and 'end'
// stacks: 'line', 'top', 'bottom'
// types: view, model_function
CRUD::addButton($stack, $name, $type, $content, $position);
CRUD::removeButton($name);
CRUD::removeButtonFromStack($name, $stack);
That's it! Thanks for sticking with us this long. This has been the most important and longest lesson. You can go ahead and install Backpack now as you've already gone through the most important features. Or read the next lesson about advanced features.