Chips
About
A chips helps show the information of a database entry, in a format that takes up little space visually. It can be used anywhere you want, but it's particularly useful inside operations to:
- show more info inside a table cell in the ListOperation;
- show a related item in more detail in the ShowOperation;
A chip consists of only one file - a blade file with the same name as the chip type (ex: general.blade.php). Backpack provides you with one chip type, that is very general (hence the name). This chip is designed to accomodate most types of database entries - but if your needs are more particular, you can easily create an entirely new chip type.
Default Chip Types
General Chip
This chip was designed to be so general, that it's useful to show most types of entries from the database. The general chip has 3 sections: heading, image and details. All sections are optional. Each of those sections has one mandatory attribute, content. Any other attributes you specify on those sections will be placed on that DOM element.
Here's a very minimal usage of the general chip:
@include('crud::chips.general', [
    'heading' => [
        'content' => 'John Doe',
    ],
    'image' => [
        'content' => asset('uploads/person1.jpg'),
    ],
    'details' => [
        [
            'icon' => 'la la-hashtag',
            'content' => '8AH13A7',
        ],
        [
            'icon' => 'la la-envelope',
            'content' => '[email protected]',
        ],
        [
            'icon' => 'la la-phone',
            'content' => '+1 (555) 123-4567',
        ]
    ]
])
But you can also specify more attributes, to enhance your chip with links, titles etc:
@include('crud::chips.general', [
    'heading' => [
        'content' => 'John Doe',
        'href' => 'https://google.com',
        'target' => '_blank',
        'title' => 'Example of a chip without URL',
    ],
    'image' => [
        'content' => asset('uploads/person1.jpg'),
        'element' => 'a',
        'href' => 'https://chatgpt.com',
        'target' => '_blank',
        'title' => 'Image can have its own URL, but why?! Falls back to the one in the heading',
    ],
    'details' => [
        [
            'icon' => 'la la-hashtag',
            'content' => '8AH13A7',
            'url' => 'mailto:[email protected]',
            'title' => 'Click to email',
        ],
        [
            'icon' => 'la la-envelope',
            'content' => '[email protected]',
            'url' => 'mailto:[email protected]',
            'title' => 'Click to email',
        ],
        [
            'icon' => 'la la-phone',
            'content' => '+1 (555) 123-4567',
            'url' => 'tel:+15551234567',
            'title' => 'Click to call',
        ]
    ]
])
How to use chips
Depending on where you want to use a chip, there are a few ways you can do that. Remember - a chip is a simple blade file, so the methods below should be pretty intuitive:
How to use a chip inside a custom blade view
If you want to load a chip inside a custom page, custom component or anything else custom, you can just include the blade view directly, and pass whatever attributes you want to show. For example, if you want to use the general chip you can just include that blade file, and pass some of the variables it supports:
{{-- Example of General chip for a person, with data from a User model --}}
@include('crud::chips.general', [
    'heading' => [
        'content' => $user->name,
        'href' => backpack_url('user/'.$user->id.'/show'),
        'title' => 'Click to preview',
    ],
    'image' => [
        'content' => backpack_avatar_url($user), // doesn't work well with dummy data
        'element' => 'a',
        'href' => backpack_url('user/'.$user->id.'/show'),
        'title' => 'Because of dummy data, this image is not available, but it would show a profile image',
    ],
    'details' => [
        [
            'icon' => 'la la-hashtag',
            'content' => $user->id,
            'url' => backpack_url('user/'.$user->id.'/show'),
            'title' => 'Click to preview',
        ],
        [
            'icon' => 'la la-envelope',
            'content' => $user->email,
            'url' => 'mailto:'.$user->email,
            'title' => 'Click to email',
        ],
        [
            'icon' => 'la la-calendar',
            'content' => $user->created_at->format('F j, Y'),
            'title' => 'Created at '.$user->created_at,
        ]
    ]
])
How to use a chip as a datatable column
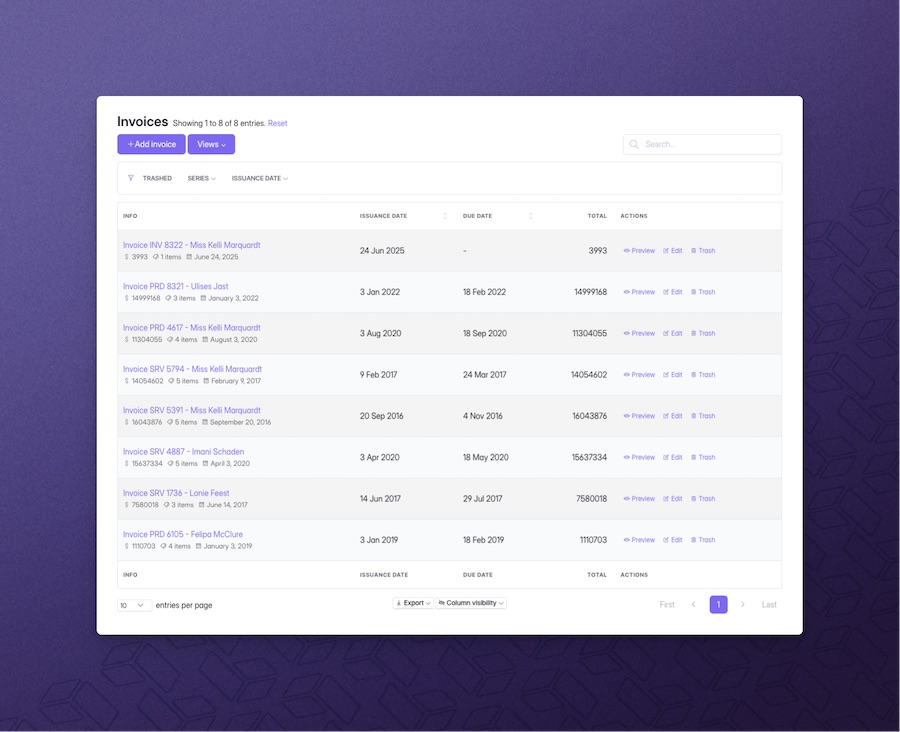
When your datatables have too many columns, chips become particularly useful. They allow you to compress the info from 5 or more columns... into a single chip column. This improves the UX of big datatables - your admins will no longer have to expand the table row or use horizontal scrolling to see crucial info.
Remember, a chip is just a simple blade file. So to use a chip as a column, we can just use the view column type, and pass the path to our chip file. For example:
// after we create an `invoice` chip
// we can use that chip as a column:
CRUD::addColumn([
    'name' => 'info',
    'type' => 'view',
    'view' => 'crud::chips.invoice',
]);
Now create that blade file, by running php artisan backpack:chip invoice. This will create a file in resources/views/admin/chips for you to edit, and customize as you like. By default, it just uses the $entry variable (which will be present if you use it as a column). You can include the general chip view if it's good enough for you, or copy-paste the HTML from the general chip, and modify it to your liking (you can run php artisan backpack:chip invoice --from=general to create a chip with all the HTML from general).
Please note:
- If your chip uses any info from RELATED items, you should probably eager load those items. For example if you're in an InvoiceCrudController you could do this in your
setupListOperation()or hell maybe even in setup():CRUD::with(['event', 'event.production', 'event.venue', 'event.venue.city']);- that way when your chip needs that info, it already has it onpage, and makes no extra queries; - By default, the view column type is not searchable. In order to make your chip columns searchable you need to specify a custom
searchLogicin your declaration. - By default, the view column type is not orderable. In order to make your chip columns orderable you need to specify a custom
orderLogicin your declaration.
How to use a chip as a widget

Chip files usually only contain the minimum content and styling necessary. You can include them as widgets directly, but they probably won't look very pretty on a custom page, because they don't have a background, borders, shadow etc. That's why we've also created a chip widget, which adds wrappers just like the other widgets - so that your chip will look good when placed on a custom page (or an existing CRUD page, why not).
To use the chip widget, you can do:
Widget::add()
    ->to('after_content') // optional
    ->type('chip')
    ->view('crud::chips.owner')
    ->title('Owner')
    ->entry($owner);
Overwriting Default Chip Types
You can override a chip by create a file in resources\views\vendor\backpack\crud\chips with the same name. But it is NOT recommended to override the general chip type. When you do that, you're forfeiting any future updates for that chip. We can't push updates to a file that you're no longer using.
In 99.9% of the cases, it's recommended NOT to override the default general chip file, but to create a custom chip file. That will make it a lot easier to upgrade to newer versions of Backpack - because the file is completely in your control.
Creating a Custom Chip Type
Chips consist of only one file - a blade file with the same name as the chip type (ex: person.blade.php). You can create one by placing a new blade file inside resources\views\vendor\backpack\crud\chips. Be careful to choose a distinctive name - usually the model name works best.
To create a new chip file in the standard directory, you can run:
php artisan backpack:chip {chip-name}to create a new file in that directory, from our stub that assumes you want to use that chip inside the ListOperation and ShowOperation, so you'll be using the$entryvariable to define what you want the chip to include;php artisan backpack:chip {chip-name} --from=generalto create a new file in that directory, from ourgeneralchip, so you can change the HTML however you want;
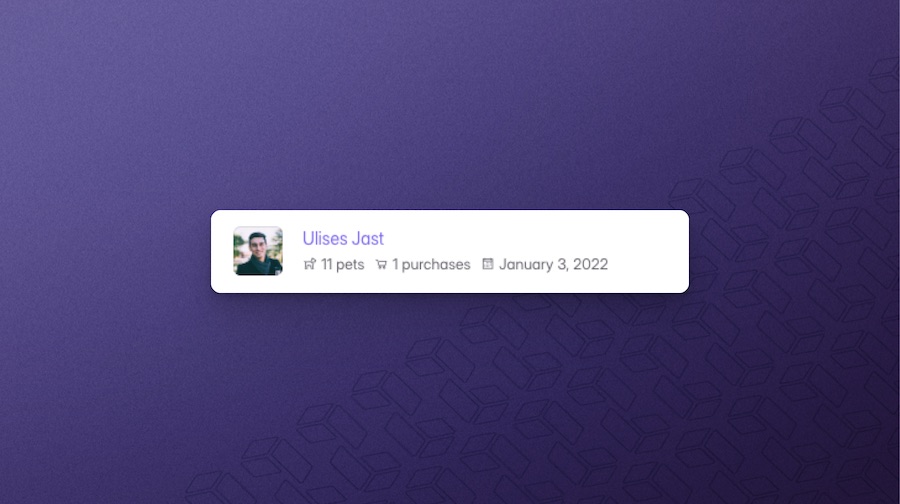
For example, you can do php artisan backpack:chip invoice to create invoice.blade.php that helps you define what that chips includes:
@php
    $last_purchase = $entry->invoices()->orderBy('issuance_date', 'DESC')->first()->issuance_date;
@endphp

@include('crud::chips.general', [
    'heading' => [
        'content' => 'Invoice '.$entry->series.' '.$entry->number.' - '.$entry->owner->name,
        'href' => backpack_url('pet-shop/invoice/'.$entry->id.'/show'),
    ],
    'details' => [
        [
            'icon' => 'la la-dollar',
            'content' => $entry->total,
            'title' => 'Total invoice amount $'.$entry->total,
        ],
        [
            'icon' => 'la la-tags',
            'content' => $entry->items->count().' items',
        ],
        [
            'icon' => 'la la-calendar',
            'content' => $last_purchase->format('F j, Y'),
            'title' => 'Issuance date: '.$last_purchase,
        ]
    ]
])
But you can also run php artisan backpack:chip custom --from=general, wipe everything inside the generated file, and include your own custom HTML, hardcoded or not:
<div class="card mb-2">
    <div class="card-body">
        <div class="row align-items-center bp-chip">
            <div class="col-auto">
                <div class="d-block">
                    <a href="https://google.com" title="Example of a chip" target="_blank" class="d-inline-block"><span class="avatar avatar-2 rounded" style="background-image: url(http://bp-v7-alpha7.test/uploads/person1.jpg)"> </span></a>
                </div>
            </div>
        <div class="col text-truncate">
            <div class="d-block">
                <a href="https://google.com" class="mb-1 d-inline-block " title="Example of a chip without URL" target="_blank">
                    John Doe
                </a>
            </div>
            <div class="d-block text-secondary text-truncate mt-n1">
                <small class="d-inline-block me-1">
                    <i class="la la-hashtag" title="Click to email"></i>
                    <a href="mailto:[email protected]" class="text-reset" title="Click to email">8AH13A7</a>
                </small>
                            <small class="d-inline-block me-1">
                    <i class="la la-envelope" title="Click to email"></i>
                    <a href="mailto:[email protected]" class="text-reset" title="Click to email">[email protected]</a>
                </small>
                            <small class="d-inline-block me-1">
                    <i class="la la-phone" title="Click to call"></i>
                    <a href="tel:+15551234567" class="text-reset" title="Click to call">+1 (555) 123-4567</a>
                </small>
            </div>
        </div>
    </div>
</div>
Otherwise, you can create a completely custom chip, that looks and works differently from the general chip, and re-use that in your application. There are no limitations - since chips are simple blade files. Just copy-paste the HTML from the general chip and change it to match your needs.