Building a CRM with Backpack for Laravel – The Fun & Easy Way
So, you want to build a CRM (Customer Relationship Management) system? But the idea of manually setting up CRUDs, operations, and all...
Karan Datwani
Share:
So, you want to build a CRM (Customer Relationship Management) system? But the idea of manually setting up CRUDs, operations, and all...

So, you want to build a CRM (Customer Relationship Management) system? But the idea of manually setting up CRUDs, operations, and all that stuff for customers, deals, and contacts make you run for the hills? Yeah, I feel you.
Well, let me introduce you to Backpack for Laravel – a laravel package that makes CRM panel development easy.
Backpack is a Laravel package that helps you create customizable admin panels faster. It provides pre-built CRUD building tools, user authentication, role management, activity tracking, widgets, charts and customizable features – all without you breaking a sweat.
A CRM needs an admin panel where sales reps can manage customers, contacts, deals, and tasks related information. Instead of writing controllers, models, and views from scratch, Backpack lets you generate everything with a few Artisan commands. It’s like magic but real.
The best part? You can fully customize it however you like. No need to build the panel components yourself—just focus on adding cool features instead of reinventing the wheel.
First things first, let’s set up a fresh Laravel project:
laravel new my-crm
cd my-crm
Now, install Backpack:
composer require backpack/crud
Run the install command and follow the instructions to set up everything:
php artisan backpack:install
And just like that, you will see a blank admin panel ready to fill with menus, CRUDs and everything!
Note: Make sure the
APP_URLin your.envfile is correctly pointing to the URL you use to access your application in the browser, for example:http:127.0.0.1:8000orhttps://yourdomain.test
For our CRM, we’ll need tables for customers, contacts, and deals. Let’s generate migrations:
php artisan make:migration create_crm_tables
Edit the migration file to include:
use Illuminate\Database\Migrations\Migration;
use Illuminate\Database\Schema\Blueprint;
use Illuminate\Support\Facades\Schema;

return new class extends Migration {
    public function up()
    {
        Schema::create('customers', function (Blueprint $table) {
            $table->id();
            $table->string('name');
            $table->string('email')->unique();
            $table->string('phone')->nullable();
            $table->text('address')->nullable();
            $table->timestamps();
        });

        Schema::create('contacts', function (Blueprint $table) {
            $table->id();
            $table->foreignId('customer_id')->constrained()->onDelete('cascade');
            $table->string('name');
            $table->string('email')->nullable();
            $table->string('phone')->nullable();
            $table->string('position')->nullable();
            $table->timestamps();
        });

        Schema::create('deals', function (Blueprint $table) {
            $table->id();
            $table->foreignId('customer_id')->constrained()->onDelete('cascade');
            $table->string('title');
            $table->decimal('value', 10, 2);
            $table->enum('status', ['open', 'won', 'lost'])->default('open');
            $table->timestamps();
        });
    }
};
Run the migration:
php artisan migrate
Our database is ready. 🚀
Here’s where the magic happens. Instead of manually coding CRUD controllers, Backpack does it for us:
php artisan backpack:crud customer
php artisan backpack:crud contact
php artisan backpack:crud deal
This creates fully functional CRUDs inside app/Http/Controllers/Admin/.
And registers the routes in routes/backpack/custom.php:
Route::crud('customer', 'CustomerCrudController');
Route::crud('contact', 'ContactCrudController');
Route::crud('deal', 'DealCrudController');
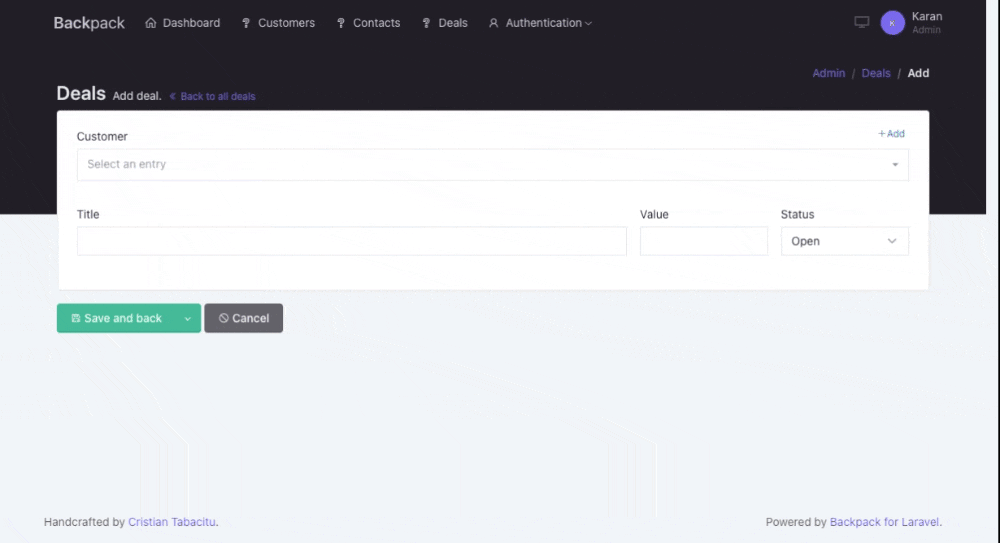
Head over to yourdomain.test/admin, and you’ll see a beautiful, CRM! 🎨🚀
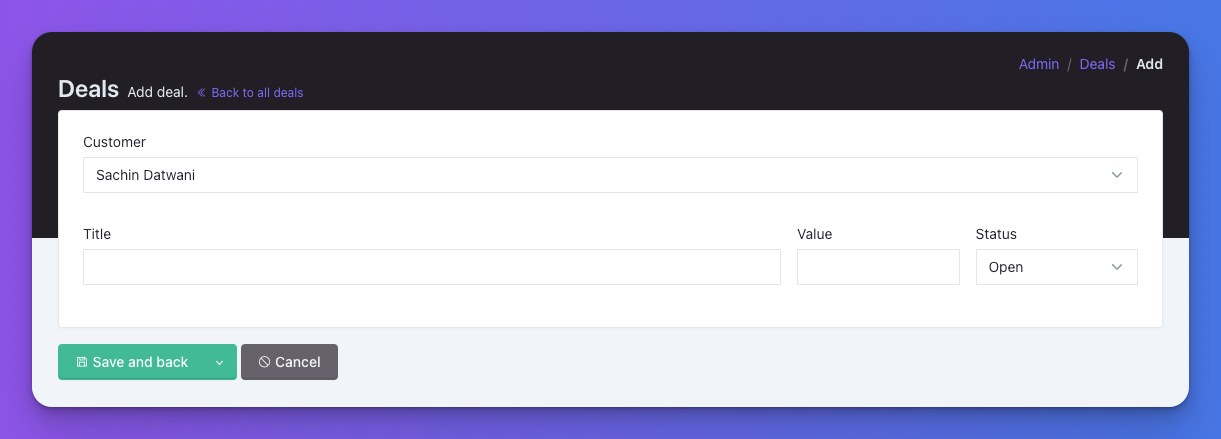
You can customize fields, filters, and columns inside each CrudController. For example, in DealCrudController.php, you can add following to add customer select field and set type & size of other fields:
protected function setupCreateOperation(){
    CRUD::setValidation(DealRequest::class);

    CRUD::field([
        'type'      => 'select',
        'name'      => 'customer_id',
        'model'     => \App\Models\Customer::class,
        'attribute' => 'name',
    ]);
    CRUD::field('title')->type('text')->size(8);
    CRUD::field('value')->type('number')->size(2);
    CRUD::field('status')->type('select_from_array')->options(['open' => 'Open', 'won' => 'Won', 'lost' => 'Lost'])->size(2);
}
Want to add inline creation or a relationship field? No problem! Backpack makes it super easy:
// in CustomerCrudController
use \Backpack\CRUD\app\Http\Controllers\Operations\InlineCreateOperation;

// in DealCrudController
use \Backpack\CRUD\app\Http\Controllers\Operations\FetchOperation;

public function fetchCustomer(){
    return $this->fetch(\App\Models\Customer::class);
}

CRUD::field([
    'type'          => "relationship",
    'name'          => 'customer_id',
    'inline_create' => true,
]);
And you will have it working:
A CRM needs role-based access control (RBAC). The PermissionManager extension helps here with easy setup:

1. Install the package and follow the instructions provided here.
composer require backpack/permissionmanager
2. Create and Assign Roles & Permissions (Using GUI) . Add permissions like manage customers and manage deals and roles like Admin, Sales Rep, and Manager and assign permissions accordingly.
3. Restricting Access in Controllers to ensure users only access what they’re permitted to, update CustomerCrudController.php:
public function setup()
{
    CRUD::setModel(Customer::class);
    CRUD::setRoute(config('backpack.base.route_prefix') . '/customer');
    CRUD::setEntityNameStrings('customer', 'customers');

    // Restrict Access
+   if (!backpack_user()->hasPermissionTo('manage customers')) {
+       CRUD::denyAccess(['list', 'create', 'update', 'delete']);
+   }
}
Now, only users with the "manage customers" permission can access this CRUD. This ensures security and proper role management.
To see Backpack’s full potential, make sure to check out the official Backpack demo. It showcases a fully functional admin panel with charts, widgets, filters, and all above features that you can integrate into your CRM. 🚀
If you want to build a CRM fast without losing your mind, Backpack for Laravel is the way to go. Now go ahead, build your CRM, and watch your development team love you for it.❤️
What’s next? In the next article, I'll take this CRM to the next level by turning it into a SaaS application. Stay tuned for more! 😎
Subscribe to our "Article Digest". We'll send you a list of the new articles, every week, month or quarter - your choice.
What do you think about this?
Wondering what our community has been up to?