How to Build an Image Slider CRUD - Backpack Basics
I was working on a website and I had to allow the admin to create image sliders to place on website pages. Sliders are common and admin...
Karan Datwani
Share:
I was working on a website and I had to allow the admin to create image sliders to place on website pages. Sliders are common and admin...
I was working on a website and I had to allow the admin to create image sliders to place on website pages. Sliders are common and admins want to change images anytime to display their latest offers, highlight info etc.
I felt sharing it as an example showcasing Backpack basics to new users. If you are up to creating a CRUD or an image slider, this will help.
Creating a CRUD is quick in Backpack. Let's jump in to see how;
We need a table to store sliders. We'll create one with the following migration:
This command would create a migration file.
php artisan make:migration create_sliders_table
We are going to add two columns to it:
name to store slider nameimages to store slider images<?php
use Illuminate\Database\Migrations\Migration;
use Illuminate\Database\Schema\Blueprint;
use Illuminate\Support\Facades\Schema;
return new class extends Migration
{
/**
* Run the migrations.
*/
public function up(): void
{
Schema::create('sliders', function (Blueprint $table) {
$table->id();
$table->string('name'); //slider name
$table->json('images'); //to store all slides
$table->timestamps();
});
}
/**
* Reverse the migrations.
*/
public function down(): void
{
Schema::dropIfExists('sliders');
}
};
Let's run the migration to have it on the DB.
php artisan migrate
Backpack comes with the following command. It quickly creates all the useful files for the CRUD. Here we pass a singular entity name, generally a Model's name. In our case, it is "slider".
php artisan backpack:crud slider
The command above will generate:
app/Models/Slider.phpapp/Http/Controllers/Admin/SliderCrudController.phpapp/Http/Requests/SliderRequest.phproutes/backpack/custom.phpresources/views/vendor/backpack/ui/inc/menu_items.blade.phpThat was quick, right? Further, you going to see how quick CRUD setup is.
Now we add fields & columns to our CRUD:
protected function setupCreateOperation()
{
    CRUD::setValidation(SliderRequest::class);
    CRUD::field([
        'name'      => 'name',
    ]);
    CRUD::field([
        'name'      => 'images',
        'type'      => 'upload_multiple',
        'withFiles' => true
    ]);
}

// and columns here to display the entries
protected function setupListOperation()
{
    CRUD::column([
        'name'      => 'name',
    ]);
    CRUD::column([
        'name'      => 'images',
        'type'      => 'upload_multiple',
    ]);
}
Done! We created a slider CRUD with FREE Backpack fields. A small code snippet takes care of everything - Form, list view, saving, uploading, unique naming etc.
This is mind blowing right?🤯 This is what Backpack does under the hood!!!
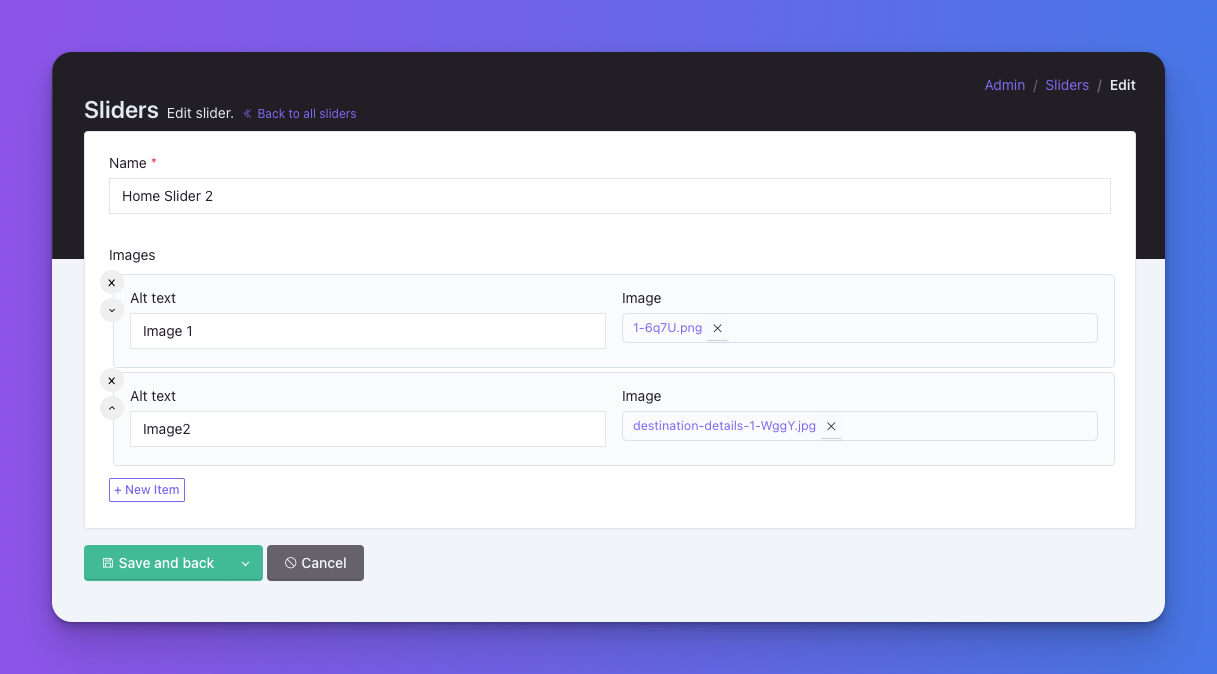
Actually, I needed a slider CRUD where the admin can reorder images, as in the above screenshot. I also need alt text for each image to make them SEO-friendly.
I used a Backpack PRO field "repeatable" to create it.
In the above code, I replaced the upload_multiple field with repeatable field and added subfields to it:
    protected function setupCreateOperation()
    {
        CRUD::setValidation(SliderRequest::class);
        CRUD::field([
            'name'      => 'name',
        ]);
        CRUD::field([
            'name'      => 'images',
            'type'      => 'repeatable',
            'subfields' => [
                [
                    'name'    => 'alt_text',
                    'wrapper' => ['class' => 'form-group col-md-6'],
                ],
                [
                    'name'    => 'image',
                    'type'    => 'upload',
                    'wrapper' => ['class' => 'form-group col-md-6'],
                    'withFiles' => [
                        'disk' => 'public', // the disk where file will be stored
                        'path' => 'slides', // the path inside the disk where file will be stored
                    ]
                ],
            ],
        ]);
    }
To display the list of attached images on slider, I choose a closure type column to help me display it as I like.
protected function setupListOperation()
    {
        CRUD::column([
            'name'      => 'name',
        ]);
        CRUD::column([
            'name'      => 'images',
            'type'     => 'closure',
            'escaped' => false,
            'function' => function ($entry) {
                // Decode the JSON string
                $data = json_decode($entry->images, true);

                $list = ''; // Initialize an empty string to store the list of <a> tags
                foreach ($data as $item) { // Iterate through each item in the JSON data and create <a> tags
                    $image = Storage::disk('public')->url($item['image']);
                    $alt_text = $item['alt_text'];
                    $list .= "<a href='$image' alt='$alt_text'>$alt_text</a><br/>"; // Add each <a> tag to the $list string
                }

                // Output the generated list of <a> tags
                return $list;
            }
        ]);
    }
The validation setup is regular. Use Laravel validation and Backpack fields to take care of error responses & display them without any extra effort.
We will use SliderRequest::class which we created earlier via command. Add rules to it & voila! they are implemented.
public function rules()
{
    return [
        'name' => 'required|min:5|max:255',
        'images.*.alt_text' => 'required',
        'images.*.image' => 'required',
    ];
}
This article is to show how quick it is to create CRUDs using Backpack. CRUDs are essential for every admin panel and Backpack covers almost everything needed to create an admin panel. It includes CRUDs, charts, widgets, operations, access control, a good collection of field types, and much more. I hope you find this useful.
For further queries, you can ask here.
Happy coding with Backpack!
Subscribe to our "Article Digest". We'll send you a list of the new articles, every week, month or quarter - your choice.
What do you think about this?
Wondering what our community has been up to?