Cheers to Lewis and Excel Imports for Backpack!
Hey there!👋 Today, we're are not just diving into the code tutorial but taking a moment to appreciate @redsquirrelstudio (aka Lewis)....
Karan Datwani
Share:
Hey there!👋 Today, we're are not just diving into the code tutorial but taking a moment to appreciate @redsquirrelstudio (aka Lewis)....
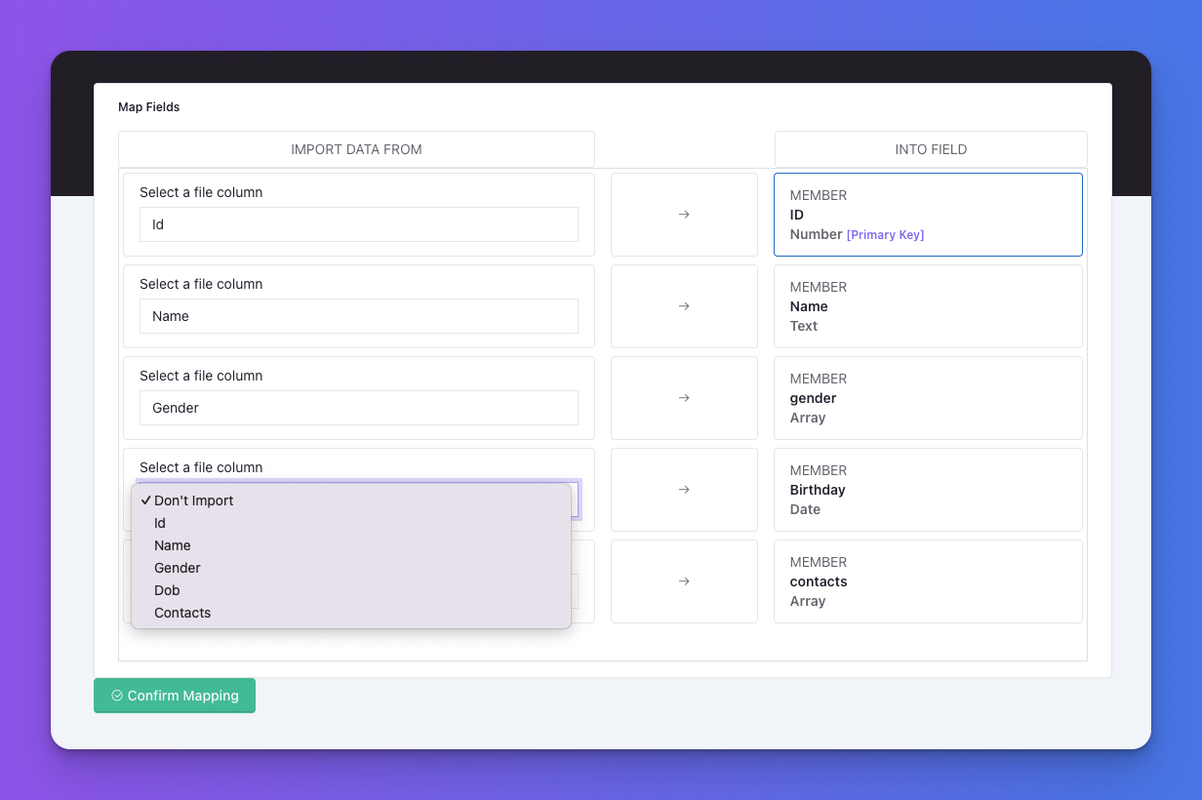
Hey there!👋 Today, we're are not just diving into the code tutorial but taking a moment to appreciate @redsquirrelstudio (aka Lewis). He has dropped a beautiful "Import Operation" package for Backpack!
This package not only imports Excel but does so with a fancy GUI for column mapping.🚀
Let's start this article by giving a big thanks to Lewis! You’ve made lives easier, and for that, we owe you a virtual high-five! 🙌 and a cup of coffee for your incredible contribution.
"With great package comes great responsibility."
Lewis, you’ve embraced that responsibility. You crafted a tool that works and does so with style. The GUI for column mapping? Pure genius. It’s like you knew exactly what we needed before we even knew it ourselves. Kudos!
composer require redsquirrelstudio/laravel-backpack-import-operation
php artisan vendor:publish --tag=laravel-backpack-import-operation-config
php artisan vendor:publish --tag=laravel-backpack-import-operation-migrations
php artisan migrate
ImportOperation to your CRUDController;class ExampleCrudController extends CrudController
{
use \Backpack\CRUD\app\Http\Controllers\Operations\ListOperation;
use \Backpack\CRUD\app\Http\Controllers\Operations\ShowOperation;
+ use \RedSquirrelStudio\LaravelBackpackImportOperation\ImportOperation;
//...
setupImportOperationprotected function setupImportOperation()
{
CRUD::addColumn([
'name' => 'id',
'type' => 'number',
]);
CRUD::addColumn([
'name' => 'name',
'type' => 'text',
]);
CRUD::addColumn([
'name' => 'gender',
'type' => 'array',
'options' => [ 'male' => 'male', 'female' => 'female',]
]);
CRUD::addColumn([
'name' => 'dob',
'label' => 'Birthday',
'type' => 'date',
]);
CRUD::addColumn([
'name' => 'contacts',
'type' => 'array',
'multiple' => true,
'options' => 'any'
]);
}
Boom! You have a working operation to import spreadsheets. No new steps! Simple as other Backpack operations.🧑💻
Currently, it comes with Text, Number, Boolean, Date and Array columns. The good thing is you're free to add your custom columns.
You are also free to customize the import process by creating your Custom Import Classes.
This is cool😎 right?
Wait! There's more!... It offers a good set of prebuilt methods to make it fit in your needs:
CRUD::setValidation(CustomerRequest::class);
$this->setExampleFileUrl('file-url');
$this->disableUserMapping();
$this->deleteFileAfterImport();
$this->queueImport();
To know more in detail, visit the package repo.
Now, let's shift the spotlight to the Backpack community. We all know that behind every great software package is an even greater community. So, a big shoutout to the Backpack developers for rolling out awesome packages.
If you've got your secret sauce – your custom packages and hacks – we want to hear from you! Share your packages, and tell us your stories. It may get listed on the Backpack add-on page.
Your package stories make us do the happy dance! 💃🕺
How to create a Backpack add-ons?
It's the express lane to becoming a Backpack maestro. The only limit is your imagination (and maybe a bit of coffee).
So there you have it! Import Operation has landed. Lewis is our hero, and the Backpack community is the heartbeat of our coding adventures. Keep crafting, keep coding, and most importantly, keep smiling.😊
The Laravel journey is an adventure, and each package, each line of code, adds a little sparkle to the magic.
P.S. Lewis, keep up the good work!
Subscribe to our "Article Digest". We'll send you a list of the new articles, every week, month or quarter - your choice.
What do you think about this?
Wondering what our community has been up to?