How to Build a Laravel Dashboard Using Backpack (In No Time)
Every successful app needs a dashboard. It’s where you keep an eye on the important stuff. However, building one from scratch is time-c...
Karan Datwani
Share:
Every successful app needs a dashboard. It’s where you keep an eye on the important stuff. However, building one from scratch is time-c...
Every successful app needs a dashboard. It’s where you keep an eye on the important stuff. However, building one from scratch is time-consuming. Luckily, with Laravel and Backpack, it's super easy. In this quick guide, I’ll show you how to set up a dashboard that looks awesome and gives you all the info you need at a glance.
This tutorial covers progress cards, charts and tables with less code and no JavaScript. Let's get started:
First up, you need a Laravel project with Laravel-Backpack/CRUD installed. If you’ve already have it, great! If not, run the following to add Backpack:
composer require backpack/crud
It's got everything: CRUDs, forms, menus, user management and many more pre-built features, so you can focus on the fun stuff.
In this example, I’m going to create a dashboard for Products, Orders, and Users. Just make sure these models & entities exist. If not, You can generate models and fully working Laravel CRUD in 5 minutes using Backpack. It’s like magic:
php artisan backpack:crud Product
php artisan backpack:crud Order
php artisan backpack:crud User
Note: These commands generate the necessary files and basic CRUDs. To make that perfect, you'll need to:
- Complete your model: Define the table structure in the migration file and specify relationships in your model.
- Customize your CRUD controllers: Specify fields, columns, and relationships etc.
You can find more details on CRUD here.
Before jumping in, let’s decide what we want on our dashboard:
To add widgets to your dashboard, you need to override the default dashboard. Just create a file at resources/views/vendor/backpack/ui/dashboard.blade.php which should extend a blank view:
@extends(backpack_view('blank'))

@php
 // We'll add widgets here
@endphp
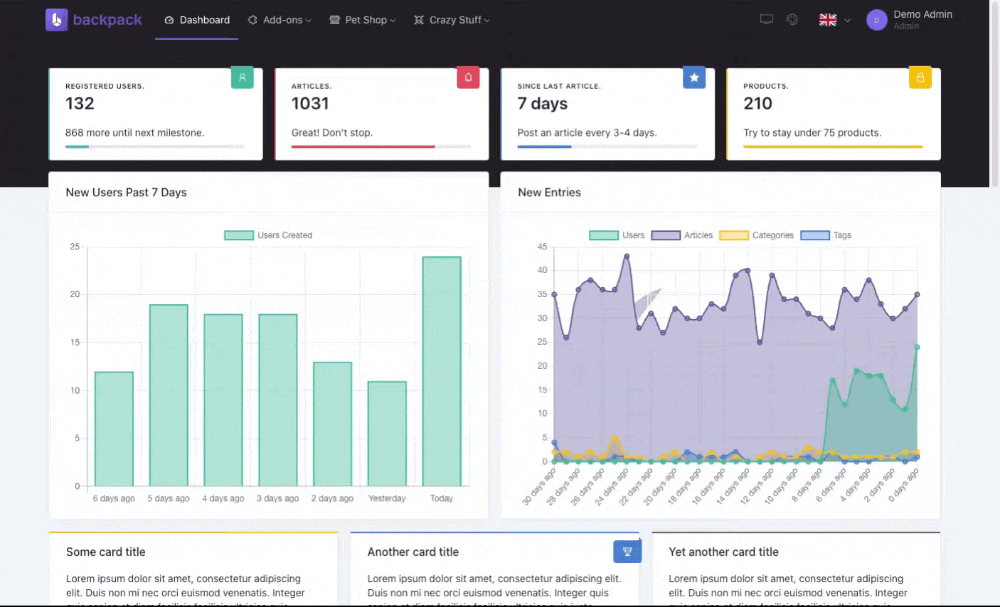
Let’s start with some progress widgets to show total counts. Think of these as the headlines of your dashboard:
@php
    $productCount = App\Models\Product::count();

    // To keep cards in a row, add a `div` widget first:
    Widget::add()->type('div')->content([

        // Now, start creating widgets inside it
        Widget::make([
            'type' => 'progress',
            'ribbon' => ['top', 'la-tags'],
            'value' => $productCount,
            'description' => 'Products.',
            'progress' => ((int) $productCount / 200) * 100,
            'hint' => $productCount > 200 ? 'Try to stay under 200 products.' : 'Good. Good.',
            'wrapperClass' => 'col-lg-4',
        ]),

        // Do the same for Orders and Users...
        // Widget::make($orders_widget_definition),
        // Widget::make($users_widget_definition),

    ])->to('before_content');
@endphp
Let’s add a couple of tables to keep an eye on recent orders 📦 and new users🙋♂️. I already had two basic views displaying the table. I wanted them in the dashboard, so I pushed them to dashboard using the view widget.
Widget::make([
    'type' => 'view',
    'view' => 'view_path.recent_orders', // path to the view
    'wrapperClass' => 'col-lg-6',
]);

Widget::make([
    'type' => 'view',
    'view' => 'view_path.new_users',
    'wrapperClass' => 'col-lg-6',
]);
Next, I’m adding a line chart 📈 to show how orders are doing over time:
php artisan backpack:chart RecentOrders
Widget::make([
    'type'       => 'chart',
    'controller' => \App\Http\Controllers\Admin\Charts\RecentOrdersChartController::class,
]);
use Backpack\CRUD\app\Http\Controllers\ChartController;
use ConsoleTVs\Charts\Classes\Chartjs\Chart;
use App\Order;

class RecentOrdersChartController extends ChartController
{
    public function setup()
    {
        $this->chart = new Chart();

        // MANDATORY. Set the labels for the dataset points
        $this->chart->labels(['6 days ago', '5 days ago', '4 days ago', '3 days ago', '2 days ago', 'Yesterday', 'Today']);
        // OPTIONAL
        $this->chart->minimalist(false);
        $this->chart->displayLegend(true);

        $today_orders = Order::whereDate('created_at', today())->count();
        $yesterday_orders = Order::whereDate('created_at', today()->subDays(1))->count();
        $orders_2_days_ago = Order::whereDate('created_at', today()->subDays(2))->count();
        $orders_3_days_ago = Order::whereDate('created_at', today()->subDays(3))->count();
        $orders_4_days_ago = Order::whereDate('created_at', today()->subDays(4))->count();
        $orders_5_days_ago = Order::whereDate('created_at', today()->subDays(5))->count();
        $orders_6_days_ago = Order::whereDate('created_at', today()->subDays(6))->count();

        $this->chart->dataset('Orders Created', 'line', [
            $orders_6_days_ago,
            $orders_5_days_ago,
            $orders_4_days_ago,
            $orders_3_days_ago,
            $orders_2_days_ago,
            $yesterday_orders,
            $today_orders,
        ])->color('rgb(66, 186, 150, 1)')
        ->backgroundColor('rgb(66, 186, 150, 0.4)');
    }
}
Note: You need Charts and Pro package installed for charts widget. Pro package also adds plenty of features.
Similarly, you can create a 🍕 Pie Chart to see a breakdown of manual vs online orders—or a Bar Chart 📊 to track user growth. Refer to this controller to make the chart load data via Ajax with a small change.
For more widget examples, refer to the demo's dashboard.blade.php
Here, I show how to build a slick dashboard showing off products, orders, and users. And the best part? We did it all without breaking a sweat. Backpack really makes Laravel dashboards a breeze. Go ahead, try it out, and make your own dashboard.
Got questions? Drop a comment, and I’m happy to help!
Subscribe to our "Article Digest". We'll send you a list of the new articles, every week, month or quarter - your choice.
What do you think about this?
Wondering what our community has been up to?